Tuesday, January 31, 2012

Red Roses


This is a PSX rubberstamp, stamped with Memories black dye ink onto white cardstock, colored with colored pencils then fussy cut it out and layered it onto orange cardstock used decorative scissors on edges and layered it all onto a red card.
Posted by Picasa

Monday, January 30, 2012

Love is Patient


Unk. Rubberstamp, stamped in Memories black dye ink on white cardstock, colored with colored pencils, edged with silver metallic pen, attached to blue card with blue metallic brads in each corner.
Posted by Picasa

Countdown to Valentine's Day

How about some VALENTINE-Y things????
I am in the mood for some hearts, is anyone else??? Okay, here
we go......(ppssssttt keep checking back)!

Happy Birthday! balloons #2


Peddler's Pack rubberstamp, stamped with Memories black dye ink on white cardstock, outlined edges with a silver metallic pen, attached to teal card with brads in each corner.
Posted by Picasa

Tuesday, January 24, 2012

Happy Birthday!! Balloons #1


This is a Peddler's Pack rubberstamp colorred with colored pencils, edged in gold metallic pen, attached to dark blue card with diamond shaped eyelets.
Posted by Picasa

Sunday, January 22, 2012

Pink Tiger Lily


A card I made quite some time ago. I think this may be an old Embossing Arts rubberstamp, not sure. It has been colored with colored pencils cut out and adhered to pink card.
Posted by Picasa

Don't Shoot Me!!!

Okay, don't shoot me! I have had a few people wondering when I was going to get more posts on here.
I have a few things in the works so just be patient. I will tell you that I am going to be posting a few cards here to hopefully give you some inspiration but I have to warn you they are not completely finished. I stamp mostly in assembly line fashion. Meaning I do all the rubberstamping of images first, whether that be the same image or different, then I do the coloring by varying methods depending on what strikes my fancy at the time, then I do the embellishing and putting on the finishing touches.
SO, with all that being said most of what you are going to see in the card postings are going to be the stamped and colored images but probably no ribbons, etc. for finishing touches. Go ahead and leave me a comment and soon I will be showing you some other completed projects I have been working on. Thanks for understanding and not saying, "Gee, that card sure is bare" even though you want to!!! LOL!!!
Oh! and I will gladly take suggestions or ideas on how you would finish these cards.

Saturday, January 14, 2012

3D Home Decor project for Valentine's Day--Class @ Little Stamp and Scrap Corner


I will be teaching this in an upcoming class at the LSS, check out the blog so you don't miss the class date! www.littlestampcorner.blogspot.com
There is a VERY limited number of them so don't miss out!!

Isn't this just the neatest little box? The box was painted black, then all the goodies were layered inside the box, has an overlay of a printed acetate sheet then a couple more layered chipboard pieces.


I added the cute little birdie to give a bit of subtle color. Then there is more acetate over everything. I added the lace layers, the string of pearls, and for a dab more color the silk roses were added at the top right.


Close up of the birdie, the chipboard pieces and the printed acetate.


You could add a little photo in here as well. A black and white would go wonderfully with this one.


Close up of the flowers


Simple and sweet. A bit different than the usual red/pink for Valentine's Day so you could leave it up on your wall all year long if you'd like. It would make a great gift, too!


This is the "bling" of sorts added to the bottom with a bow. If you look closely you will see the itty bitty green bird attached to the acrylic drop. So adorable!
I hope you are one of the "lucky ones" that get to join us in making this project!!
Posted by Picasa

Sunday, January 8, 2012

Valentine Keepsake Box

HAPPY VALENTINE'S DAY!!!!

I have put this box on display at the LSS, Little Stamp and Scrap Corner in Scottsbluff, NE for your viewing pleasure ;) so stop in and get a real good look at it if you'd like.

I actually made this box probably about 12 or so years ago. My daughter used it one year (about 10 yrs ago) for her school Valentine box, my sister used it in her classroom last year for her Valentine box and the kids from both "eras" just went crazy for it. It was much easier than it looks. I just kept adding things until I liked it. The first thing you need is a really nice box to work with. The top on this one is the flap that comes up and the sides of the box don't go inside the box they actually are on the outside when it closes down. The lid is NOT flimsy like some.


This was a box from an old pair of my work boots (another story indeed!)
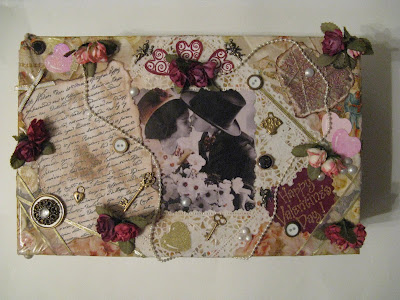
This is the top of the box. I used a picture from an old Kim Anderson calendar, white and gold doilies, stamped and embossed hearts of various kinds/various companies, handwriting rubber stamp--unk. co., flat back pearls, pearl strand, charms, buttons, ribbons, ribbon roses. But the very base paper is a Victorian looking wrapping paper with little cherubs, hearts, and flowers all over it. So I just stayed with that design idea. You really can't tell what the paper is once it is all covered. Do a little or do a lot it's up to you.


This is the front of the box. There are buttons and lace added as well as the items I mentioned above.


This is the right side.


This is the left side.
Posted by Picasa


The back of the box. On some of the rubberstamped and embossed hearts there is also gold thread wrapped around them, which is kind of a fun look.


A close-up of the left side of the top of the box. Flowers, buttons, charms, ribbons, rubber stamped and embossed images, and pearls. 


Close-up of the right side of the top of the box. Don't you just adore the Kim Anderson kids???
So cute and the black and white images just can't be beat!


I think the charms just add so much to this box.


aaaww, a little peck on the nose.....


Just so darn cute!


So go get yourself a shoebox and get creative so you have somewhere beautiful to put all those
 beautiful handmade Valentines you are about to receive!!
Or go make two or three (there's time) and then give it away WITH a card! Honest, it is super
simple and so much fun! The hardest part is deciding what you want on it. Your wrapping paper could be any color at all, patterned paper or solid it just won't matter. It can all be done in one day.
I am lending this to my LSS for display purposes in the hopes of inspiring others to make one for themselves, or others.
Keep checking back for the pics of the class I will be teaching in February you are going to LOVE it! Or you can go to www.littlestampcorner.blogspot.com as it will be posted there soon, too.

I have more fun things in store for late January and into February as well! I hope to get your creative juices overflowing with ideas.
Posted by Picasa

Thursday, January 5, 2012

Peach Roses Double L/O


How about a L/O for a change? I have had this idea running around in my head ever since I first laid eyes on this paper line. LOOOOVEEEE ITTT!!! I think it turned out really great! Almost better than what I had in my head. I only wish I would have had some black pearl beads to use on it instead. Now I just have to find the perfect photo for it, this time I made it for me! I haven't done much scrapping for my own books at all lately. I really need to start doing at least one L/O a week for me, then maybe I would have some things to go into my scrapbooks! 


Here's a closeup-not sure if this will end up being the right side or the left, will depend on the pics I find for it.


Here's the other one. Love how this doily came out, too!
I picked up the beautiful paper at my LSS.
Check out their blog @ www.littlestampcorner.blogspot.com  and
watch for more of my classes coming up.


Another closeup of the fussy cut edge of the roses and the silk roses in the top left corner, and the black netting. Love this look, so vintage. I am definitely going to use this look more often and I can't wait to see what other colors I can use for different effects.


Another look at the silk roses and netting.


I fussy cut out some of the rose buds and leaves and layered them on the doily.


And another doily and fussy cut roses.
Posted by Picasa

Monday, January 2, 2012

Flower cards


Okay, needed a break from the Christmas thing so here's a few floral cards just for the fun of it.


Used one image and stamped it twice. Colored in pencil


I LOVE PSX, wish they wouldn't have gone out of business. They had such awesome botanical and bird stamps.


Can't remember who makes this stamp. Pretty versatile. Next time I am thinking of fussy cutting another bunch of these petals and layering them over the top.

Stay tuned, within the next few weeks I will be showing you some really fun things that I am making for the LSS for display and for class. Also, if you get a chance stop in at
www.littlestampcorner.blogspot.com
 and see what all they have going on. Soon there will be a gallery of ideas that you can view. LOTS more coming up there in the next few weeks so be sure and stop back often. TFL! and remember, any and all creative comments are very welcome!
Posted by Picasa